 English
 Afrikaans
 العربية
 বাংলা
বাংলা bosanski jezik
 Български
 Català
 粤语
粤语 中文(简体)
 中文(漢字)
 Hrvatski
 Čeština
 Nederlands
 Eesti keel
 Suomi
Suomi Français
 Deutsch
 Ελληνικά
 हिन्दी; हिंदी
 Magyar
 Bahasa Indonesia
 Italiano
 日本語
日本語 한국어
한국어 Latviešu valoda
 Lietuvių kalba
 македонски јазик
 Bahasa Melayu
 Norsk
Norsk پارسی
پارسی Polski
 Português
 Română
 Русский
 Cрпски језик
 Slovenčina
 Slovenščina
 Español
 Svenska
 ภาษาไทย
 Türkçe
 Українська
 اردو
اردو Tiếng Việt
Ο ψηφιακός αισθητήρας θερμοκρασίας DS18B20 είναι ένας ψηφιακός αισθητήρας θερμοκρασίας ενός διαύλου που παράγεται από την DALLAS, ΗΠΑ. Διαθέτει μεγάλο εύρος μέτρησης θερμοκρασίας (-55℃~+125 ℃) και εγγενής ανάλυση μέτρησης θερμοκρασίας 0,5℃. Το DS18B20 υποστηρίζει λειτουργία δικτύωσης πολλαπλών σημείων, και πολλαπλά DS18B20 μπορούν να συνδεθούν παράλληλα στα μόνα τρία καλώδια για να επιτευχθεί μέτρηση θερμοκρασίας πολλών σημείων. Τα αποτελέσματα των μετρήσεων μεταδίδονται σειριακά σε ψηφιακή ποσότητα 9~12 bit.
Ας συνδέσουμε το DS18B20 στο Arduino. Οι συνδέσεις είναι απλές. Ξεκινήστε συνδέοντας το VDD στον ακροδέκτη 5V του Arduino και το GND στη γείωση.
Για να συνδέσετε τον ψηφιακό αισθητήρα θερμοκρασίας DS18B20 στο Arduino, πρέπει να κάνετε τα παρακάτω βήματα:
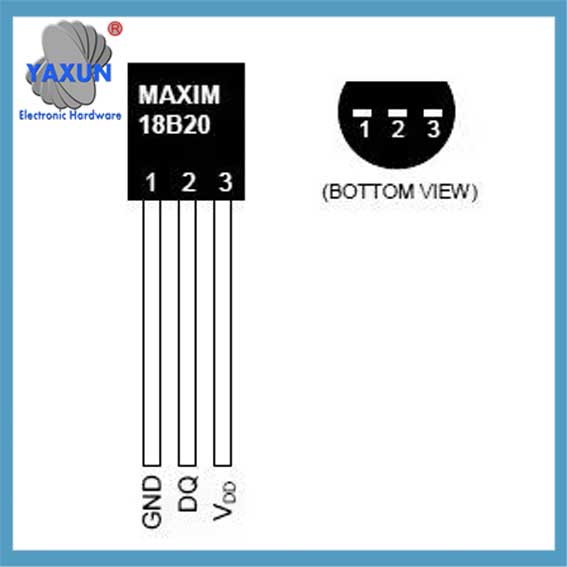
Λειτουργίες pin του ψηφιακού τσιπ μέτρησης θερμοκρασίας DS18B20
Σύνδεση υλικού:
Συνδέστε τον ακροδέκτη VCC του DS18B20 στον ακροδέκτη τροφοδοσίας 3,3 V του Arduino.
Συνδέστε τον ακροδέκτη GND του DS18B20 στον πείρο γείωσης του Arduino.
Συνδέστε τον ακροδέκτη δεδομένων του DS18B20 στον ακροδέκτη GPIO του Arduino (για παράδειγμα, GPIO4).
Συνδέστε μια αντίσταση έλξης 4,7 kΩ μεταξύ της ακίδας δεδομένων και της ακίδας τροφοδοσίας 3,3 V.
Διαμόρφωση λογισμικού:
Βεβαιωθείτε ότι έχετε εγκαταστήσει το Arduino IDE και έχετε εγκαταστήσει τις υποστηρικτικές βιβλιοθήκες για την πλακέτα ανάπτυξης Arduino στο IDE.
Γράψτε κώδικα στο Arduino IDE για να διαβάσετε τα δεδομένα θερμοκρασίας από τον αισθητήρα DS18B20.
Ο αισθητήρας DS18B20 είναι μοναδικός στο ότι η μοναδική του διασύνδεση 1-Wire® απαιτεί μόνο μια ακίδα θύρας για επικοινωνία, και κάθε συσκευή έχει έναν μοναδικό σειριακό κωδικό 64-bit που είναι αποθηκευμένος στην ενσωματωμένη ROM. Εξάλλου, υποστηρίζει τροφοδοσία μέσω της γραμμής δεδομένων, με εύρος τροφοδοσίας από 3,0V έως 5,5V, καθιστώντας το εξαιρετικά ευέλικτο σε μια ποικιλία εφαρμογών. Οι εφαρμογές για το DS18B20 περιλαμβάνουν θερμοστάτες, βιομηχανικά συστήματα, καταναλωτικά προϊόντα, θερμόμετρα, ή οποιοδήποτε θερμοευαίσθητο σύστημα, και τα λοιπά
Ο DS18B20 είναι ένας ψηφιακός αισθητήρας θερμοκρασίας 1 καλωδίου από το Maxim IC. Αναφέρει βαθμούς Κελσίου από -55 να 125 (+/-0.5) με 9 να 12 ψηφία ακρίβειας. Κάθε αισθητήρας είναι χαραγμένος με έναν μοναδικό σειριακό αριθμό 64-bit – επιτρέποντας τη χρήση μεγάλου αριθμού αισθητήρων σε έναν δίαυλο δεδομένων.
Λειτουργικά στοιχεία σύνδεσης του ψηφιακού αισθητήρα θερμοκρασίας DS18B20 στο Arduino
Χαρακτηριστικά:
Η μοναδική διεπαφή 1-Wire® απαιτεί μόνο μία ακίδα θύρας για επικοινωνία;
Κάθε συσκευή έχει έναν μοναδικό σειριακό κωδικό 64-bit που είναι αποθηκευμένος στην ενσωματωμένη ROM;
Η δυνατότητα πολλαπλών σταγόνων απλοποιεί τις κατανεμημένες εφαρμογές ανίχνευσης θερμοκρασίας;
Δεν απαιτούνται εξωτερικά εξαρτήματα;
Μπορεί να τροφοδοτηθεί μέσω της γραμμής δεδομένων.
Το εύρος τροφοδοσίας είναι 3,0V έως 5,5V;
Μετρά θερμοκρασία από –55°C έως +125°C (–67°F έως +257°F) ±0,5°C Η ακρίβεια είναι -10°C έως +85°C;
Η ανάλυση του θερμομέτρου είναι διαθέσιμη από τον χρήστη 9 να 12 κομμάτια;
Μετατρέπει τη θερμοκρασία σε ψηφιακή λέξη 12 bit 750 χιλιοστά του δευτερολέπτου (μέγ);
Μη πτητικό που ορίζεται από το χρήστη (NV) ρυθμίσεις συναγερμού;
Η εντολή αναζήτησης συναγερμού προσδιορίζει και απευθύνεται σε συσκευές με θερμοκρασίες εκτός προγραμματισμένων ορίων (κατάσταση συναγερμού θερμοκρασίας);
Οι εφαρμογές περιλαμβάνουν θερμοστάτες, βιομηχανικά συστήματα, καταναλωτικά προϊόντα, θερμόμετρα, ή οποιοδήποτε θερμοευαίσθητο σύστημα.
Βήμα 2: Τι Χρειάζεστε:
Για να φτιάξετε το θερμόμετρο, θα χρειαστείτε τα παρακάτω στοιχεία:
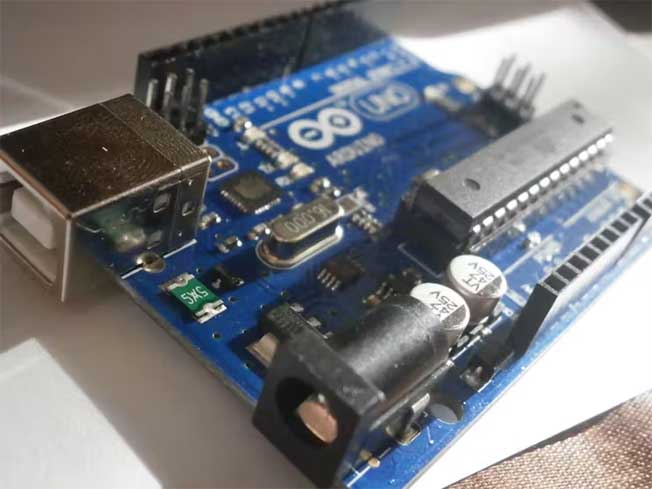
Μια πλακέτα Arduino (ΕΝΑ, ΟΦΕΙΛΟΜΕΝΟΣ, Μικρο, και τα λοιπά.).
Ένας αδιάβροχος αισθητήρας DS18B20 και μια αντίσταση 4,7 k.
Καλώδια βραχυκυκλωτήρα για να συνδέσετε τα πάντα μεταξύ τους.
Ορισμένα καταστήματα πωλούν αισθητήρες με αντίσταση 4,7 k.
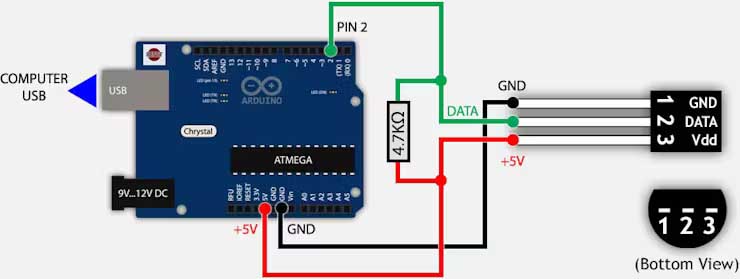
Κατασκευάστε ένα απλό κύκλωμα συνδέοντας τον ψηφιακό αισθητήρα DS18B20 στο Arduino
Βήμα 3: Κατασκευάστε ένα απλό κύκλωμα
Για να εκτυπώσετε τα δεδομένα από το DS18B20 στη σειριακή οθόνη του IDE, πρέπει να φτιάξετε το κύκλωμα σύμφωνα με το σχηματικό.
Συνδέστε πρώτα τον αισθητήρα στο breadboard και συνδέστε τις ακίδες του στο Arduino χρησιμοποιώντας βραχυκυκλωτήρες με την ακόλουθη σειρά: καρφίτσα 1 προς GND; καρφίτσα 2 σε οποιοδήποτε ψηφιακό pin (καρφίτσα 2 στην περίπτωσή μας); καρφίτσα 3 στα +5V ή +3,3V και τέλος την αντίσταση έλξης.